Getting Started
Living Art Studio brings static 2D artwork to life. A single shader hosts a catalogue of GPU effects (fire, water, magic, sun rays, sheen, custom flows, and more) driven by a multi-channel mask atlas. The package includes a complete in-editor painting tool for authoring those masks and effects settings, so you can decide exactly where and how each effect appears with a brush.
Installation
- Import Living Art Studio from the Unity Asset Store, or add it locally via Window → Package Manager → + → Add package from disk and select
Packages/com.kobapps.livingart/package.json. - The package installs under
Packages/com.kobapps.livingart. No files are placed at the project root. - Render pipeline. The package ships with three shaders, one for each supported render target (UGUI, SpriteRenderer, and MeshRenderer). Every shader contains both a URP SubShader and a Built-in fallback, which allows the same material to render correctly under either pipeline. Unity selects the appropriate variant automatically.
- Minimum Unity version. 2022.3 LTS. The package has been tested on 6000.4.0f1.
Folder layout
After installation, the package contents are organized as follows. Shaders are located in Runtime/Shaders, alongside their shared HLSL include files. The built-in effect ScriptableObjects are stored in Runtime/Data/Defaults. The editor implementation is divided across several folders: Editor/Window contains the window shell and session state, Editor/Painting contains the brush, undo stack, and mask serialization logic, Editor/Canvas contains the paint canvas and on-canvas handles, Editor/Inspectors contains the channel list and parameter panel, and Editor/Materials contains the new-material factory and picker. Sample scenes are stored in Samples~ and become visible in the project only after they are imported via the Package Manager.
Quick Start
- Open the window from
Tools → Living Art Studio → Open Studio Window. - Create a material. When the active tab is empty, the canvas area presents quick-create buttons for the three supported render targets: UI, Sprite, and Mesh.
- Assign source artwork by dragging a Texture asset onto the editor, or by selecting one through the browse button.
- Activate a channel by clicking the activation toggle on the left of a row in the Channels list (for example, Fire). New materials begin with all channels disabled, so each effect is enabled explicitly when required.
- Paint the regions where the effect should render. Brush size, softness, and opacity controls are located in the right sidebar.
- Save the material with
Ctrl/Cmd + S, or with the toolbar's Save button. The save operation writes both the material and its companion mask file. For an unsaved draft, the first save will prompt for a destination folder.
Once these steps are complete, all effect parameters can be adjusted live in the right sidebar.
The Welcome Window
The first time you import the package, a Welcome window pops up automatically. You can reopen it any time from Tools → Living Art Studio → Welcome. It's the fastest way to get oriented and pull in everything you need to start painting.
- Open Studio Window — opens the main editing window where you paint masks and tweak effects.
- Import Sample Scenes — opens the Package Manager so you can import the bundled demo scenes (cards, promotional art, mesh / sprite / UI targets). Add them to Build Settings (File → Build Settings → Add Open Scenes) to use the in-scene navigation menu.
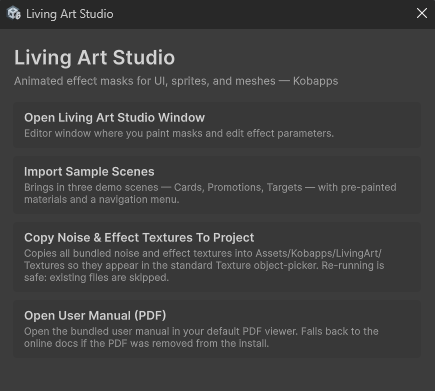
- Copy Noise & Effect Textures To Project — copies the shipped noise and effect texture library into your project so you can browse and assign them from your own materials without dipping into the package folder.
- Open User Manual — opens this manual (the bundled PDF) in your default viewer.
The window is safe to close and reopen — it doesn't track which buttons you've already used, so you can come back to it later to import samples or refresh the texture library.